

Overview:
Students create a dye sensitized solar cell that can generate a small current using nanocrystalline TiO2 and berry juice.
Essential Question:
How can we make a device which captures solar energy to produce electricity?
Background:

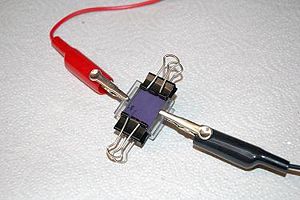
A finished cell is held together with clips.
This dye-sensitized solar cell, also known as a Grätzel cell, uses a thin film of titanium dioxide which has been ground to a fine powder (nanocrystalline) to increase its reactive surface area. The TiO2 is sandwiched between two glass slides that are coated with conductive and transparent indium tin oxide (ITO). The TiO2 is impregnated with some kind of colored dye, in this case anthocyanin from raspberry juice, which is the chemical which first traps the solar energy and passes the charge to the TiO2. Finally, the space between the slides is filled with a liquid electrolyte solution of potassium iodide which serves to transport charge (by way of a redox reaction) from the bottom electrode to the dye to complete the circuit.
Research Connection:

Light hits the dye which frees an electron to be accepted by the TiO2, electrons are returned to the dye by a redox reaction in the potassium iodide solution in contact with the rear electrode.
Researcher are seeking new materials that can be used for solar cells that are cheaper to manufacture that conventional silicon. The Grätzel cell is has been the focus of years of research but has failed to become a commercial success.
NGSS Standards:
| Standard Number | Standard text |
| HS-PS3-3 | Design, build, and refine a device that works within given constraints to convert one form of energy into another form of energy.* |
Materials:
- Titanium oxide (TiO2) coated FTO slides
- Mortar and pestle
- Berries
- Distilled water
- Petri Dish
- Tweezers
- Ethanol or isopropanol
- Conductive glass slide
- Graphite pencil
- Iodide electrolyte solution
- Binder clips
- Multimeter with alligator clip leads
Procedure:
Part 1: Staining the TiO2 with Anthocyanin Dye
- Use a mortar and pestle to crush 3-4 berries. Transfer to a Petri dish.
- Add about a tablespoon (15mL) of distilled water to the crushed berries and stir with a clean glass rod
- Take the TiO2 coated slide and place it TiO2-side down into the berry mixture
- Let the slide soak for 10 minutes in the berry juice. The film should be stained bright purple/pink. If any white TiO2 remains, return the slide back to the juice for another 10 minutes. (You can go onto Part 2 while you wait for the slide to stain)
- Lift the slide out of the juice using tweezers. Rinse the slide first with distilled water, then rinse with ethanol. Blot the slide dry with a tissue.
Part 2: Carbon Coating the Counter Electrode
- Determine the conductive side of a FTO coated glass slide using a multimeter. Set the meter to measure Ohms and put both leads on one side of the slide, if the resistance measured is near zero, that is the conductive side.
- Place a piece of tape over one edge, covering about 4mm of the slide
- Use a graphite pencil to cover the conductive side with a thin layer of graphite (conductive carbon) and remove the tape.
- The carbon coating is fragile and can be easily rubbed off. Be careful not to touch it.
This carbon acts as a catalyst for converting triiodide to iodide. A catalyst is a substance that increases the rate of reaction without being consumed.
Part 3: Assembling the Solar Cell
- The berry-stained TiO2 slide and the carbon-coated slide will be sandwiched together to make the solar cell.
- Identify the clean 4mm strip on each slide. These strips will be connected to alligator clips to test your cell. Orient the strips so that are on opposite sides as shown.
- Place the carbon-coated slide on the table face up. Place the berry-stained slide on top of it so that the coated areas match up and are touching with a 4 mm strip on each side, shown below.
- Pick up the slides in this orientation, careful not to let them move. Clip the edges (the two without the 4mm strip s) with binder clips to hold the cell together.
- Remove one binder clip and place 1 or 2 drops of iodine electrolyte solution at the edge of the slides. Re-clip the slides together.
- Alternately open and close each side of the solar cell by releasing and returning the binder clips. Make sure that all the stained area is wetted with this solution. Make sure the binder clips are just on the edge of the cell not covering the coated area.
- Wipe off excess electrolyte solution with a small amount of ethanol on a tissue. Make sure there is no electrolyte solution on the 4mm strips where the alligator clips will attach.
Part 4: Testing Your Solar Cell
- Use a multimeter and attach the alligator clips to your cell: one clip on each side.
- Turn the multimeter to measure current (A). Note the current before placing your cell under the lamp.
- Place your device under the lamp and write down the current measured.
- Turn the multimeter to measure voltage (V) and note this value with and without the light.
If the numbers changed you successfully made a working solar cell!
Extensions:
Try other types of berries, synthetic dyes or food colorings. See if thickness of the coating makes a difference.
Resources
Download documents for this lesson plan:
Download Nanocrytalline Lesson Plan in pdf
Download Nanocrystalline Lesson Plan in word
Download Nanocrystalline Worksheet in word
Download CEI powerpoint slides on Nanocrystalline Lesson
Watch videos on Berry Solar Cell- Nanocrystalline TiO2:
Extended reading:
Dye Sensitized solar cells on Wikipedia
Alternative Device Instructions:
Office of Energy Efficiency and Renewable Energy (EERE) lesson plans
Sources
Institute for Chemical Education – Nanocrystalline Solar Cell Kit