

By Alan Zahn
Overview:
This lesson describes how to make simple electromagnets and a motor that is powered by a solar panel.
Essential Question:
How can electricity be used to cause magnetism?
Background:
A magnet is an object that produces a magnetic field. We are already familiar with certain types of magnetic fields such as the Earth’s magnetic field that a compass uses to point north, or refrigerator magnets that use magnetic fields to stick. Magnets have uses beyond being interesting toys and sticking things on metal, and one of the most widespread uses of magnets in industry is in electric motors. In electric motors, the magnet is used to generate rotation using electrical current passing through loops of wire.
Many of the magnets we are most familiar with are considered permanent magnets. These include common magnets like refrigerator magnets, horseshoe and bar magnets, and rare earth magnets. The magnetic field from these magnets is due to the orientation of electrons in the magnet, which generally does not change.
Another category of magnets that we will explore today is the electromagnet. An electromagnet is a material that normally not magnetic, but when electrical current passes through it, becomes a magnet. A common example of an electromagnet is a curled loop of insulated wire wound like a spring. In an electromagnet, the strength of the magnetic field depends primarily on the amount of current passing through the wire, the number of loops the wire makes in a given distance, and the material the wire is wound around. These magnets are used in many applications including headphones and speakers, motors, and scientific research.
Now that we know how to make an electromagnet from insulated wire, we need to provide a source of electrical current. For this experiment, we will use a solar panel. Solar panels are made of materials that turn energy from the sun in the form of light into electricity we can use.
Before doing any of these experiments, remember that electricity is passing through the coil. While it is not high enough voltage to electrify, when the solar cell is connected to the magnet, the wiring can heat up and cause burns. Always be careful while handling an electric circuit, even if it is not high voltage or high current.
Research Connection:
Researchers are using nanotechnology to create new magnetic materials and devices.
NGSS Standards:
| Standard Number | Standard text |
| MS-PS2-3 | Ask questions about data to determine the factors that affect the strength of electric and magnetic forces. |
| MS-PS2-5 | Conduct an investigation and evaluate the experimental design to provide evidence that fields exist between objects exerting forces on each other even though the objects are not in contact. |
| HS-PS2-5 | Plan and conduct an investigation to provide evidence that an electric current can produce a magnetic field and that a changing magnetic field can produce an electric current. |
Materials:
- 1 Amp solar panel
- At least a 2 inch long galvanized steel (not stainless!) screw or bolt
- Insulated magnet wire (22 gauge-26 gauge)
- Medium grit sandpaper
- Magnet or Iron fillings for testing
- Scissors or wire cutters
Procedure:
Bar electromagnet:
The first electromagnet we will make is a bar magnet.
Steps:
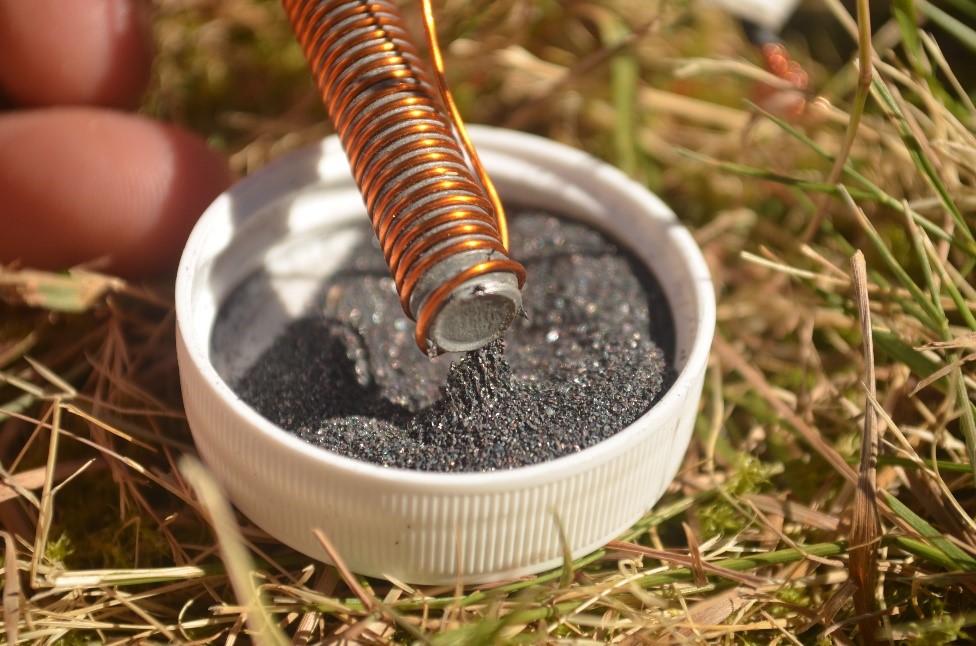
Electromagnet attracting iron fillings
- Sand off about half an inch of the insulation at one end of the wire with the sand paper.
- Start wrapping the wire around the screw or bolt as neatly as possible, and only in one direction leaving around 4 inches of wire free. Going once over should be enough.
- When finished wrapping the bolt, cut off the end, leaving around 4 inches of free hanging wire.
- Sand off about half an inch of the insulation at the other end of the wrapped wire.
- Attach the bare copper ends to the solar panel.
- Now you can use iron fillings or a compass to play with your new electromagnet!
DC Electric motor
Now that we can make a simple electromagnet, we can make another one that looks a little different and use it to make an electric motor! We will need
- 1 Amp solar panel
- Neodymium magnet
- Two paper clips
- Medium grit sand paper
- Tape
- Insulated magnet wire (22-26 gauge)
- Round cylindrical object about the size of a D-cell battery
- 2 inch diameter or width non conducting object (plastic cup, lid, etc)
- Scissors or wire cutters
- Electrical tape (optional)
- Ohm meter (optional, for troubleshooting)
Steps:
- First we begin by wrapping the insulated magnet wire around the cylindrical object, leaving 3 inches unwound and free. Do 15-20 winds of wire around the battery, and cut the wire, again leaving around 3 inches unwound and free.
- Wrap some of the free wire around the coil, keeping the coil as tight as possible. On the exact opposite, do the same, leaving about an inch free. Now we have a magnet coil!
- Sand off all of the insulation on one end, and HALF of the insulation on the other end of the magnet coil.

Shown is the finished base (a plastic lid) of the motor. The two paper clips are taped to opposite sides of the base, with the copper wire wrapped around them to create an electrical connection. The ends of wires connected to the paper clips have the insulation on one side removed. As I used a metallic base, the paper clips are not taped directly to the base, but to tape wrapped around it.
- Make sure the magnet coil is neatly round, and that the two arms are as straight as possible as well as on opposite sides. This will make sure that the magnet coil spins well.
- Unfold the two paper clips into a p shape
- Tape the two paper clips onto opposite ends of the 2 inch diameter cylindrical object. This will be the platform.
- Cut two 4-6 inch sections of magnet wire, and sand off about half an inch of insulation, from one side of the wire, on both ends of each wire.
- Make electrical connections to both the paper clips using the two wires. You can do this by simply wrapping the bare copper wire around the paper clip, or taping the bare copper wire to paper clip with electrical tape.
- Place the neodymium magnet at the center of the 2 inch diameter base. Adjust the paper clips so that the magnet coil sits just above, but not touching the neodymium magnet.
- Connect the other ends of the wires to the solar panel leads.

Completed motor showing the magnet coil placed just above the neodymium magnet.
- Place the magnet coil in the paper clips, and give it a light flick, and the coil should start spinning on its own. The paper clips and the coil may need some adjustment. Try to keep the magnet wire leads as straight as possible and keep the two paper clips as level as possible.
Troubleshooting:
- If your motor is not working, and the paper clips are well aligned, and the magnet coil is made well, the electrical connection between the paper clips, magnet coil, and wires may not be well connected.
- In that case, you can use an ohm meter to check the connection. Assemble the motor to the stage shown below (the neodymium magnet is optional, it does not conduct electricity in this motor), making sure that the magnet coil’s free ends have their conducting sides touching the paper clip:
- Using the tips of the ohm meter test the two free ends of wire connected to the paper clip, one tip on each of the ends.
- If all is well, the resistance measured should be around 1 ohm. If the resistance is much higher, or not registering, there is an electrical short. In that case, test each part of your circuit one by one.
- Start with one of the free wire ends to paper clip connection, and then keeping one of the probes on that free wire end, move the other probe along the circuit. Test the wire to the close end of the magnet coil, the wire to the far end of the coil, the wire to the far paper clip, and finally the wire to the other free wire. If at any point, the ohm meter fails to measure a resistance, there is an electrical short, and current is not flowing. Play around with the connection, and if that does not work, make sure that all of the wire ends are properly sanded.
How it works:
Electricity flows into paper clip and then into the bare side of the copper coil. As soon as the current flows it induces a magnetic field in the coil. One side of this field is repelled by the magnet while the other side is attracted. The coil turns slightly rotating around to the point where the insulated side of the wire touches the paperclip and the current stops flowing. It has enough momentum to continue spinning around to the start position where it is energized again. With each rotation there is a pulse of electricity to keep it turning.
Extensions:
Try making a DC motor with proper commutators
Resources:
- Solar Powered Electromagnet lesson
- https://youtu.be/x2R87IfwigQ