

Solar Car Derby
Students design and assemble model solar cars and race them on a track.
QUESTION
What design makes the fastest solar car?
Background
A solar car captures solar energy with solar cells, converts the energy to electricity that powers electric motors. In a large scale it’s very difficult to capture enough energy from the roof of a car to power a vehicle. One example is the 3000 km World Solar Challenge in Australia in which 1000 Watt solar panels power very light efficient vehicles with minimal battery storage.
Model car races are a common science and engineering activity for youth groups because they are engaging, open-ended and have the excitement of competition. This gives us the chance to work in some great science concepts and engineering practices. The level of presentation can also be modified for different audiences.
Research Connection
Researchers are creating new solar materials, efficient batteries and management systems for battery storage.
NGSS Standards
| Standard Number | Standard text |
| 4-PS3-2 | Make observations to provide evidence that energy can be transferred from place to place by sound, light, heat, and electric currents. |
| 4-PS3-4 | Apply scientific ideas to design, test, and refine a device that converts energy from one form to another.* |
| MS-PS2-3 | Ask questions about data to determine the factors that affect the strength of electric and magnetic forces. |
Materials
- Solar Car Bodies Pitsco Sunzoom Lite ($12.75) and Solar Designer ($12.95) Ray Catcher Sprint Kit ($52.95)Cardboard
- Mini solar car assembly kits
- Assorted other solar cells with clip leads
- Aluminum foil or aluminized mylar
- Hot glue gun and low temperature hot glue
- Adhesive Velcro strips
- Duct tape
- Utility knife
- Clip leads
- Volt /multimeter
- Clip on light bulbs
- 500 Halogen worklight on stand (very hot- works best for indoor race)
- Stopwatch
- Smooth race track
- Soldering iron, solder, wire.
Procedure
Basic construction – Hardening
The basic design of the cars is a piece of thin wood or plastic with screw eyes or plastic tubes that serve as bearing for attaching the axles, or a plastic girder with holes for the axles. The Pitsco kits come with a set of gears which fit either on the motor shaft or on the axles. Be sure to make sure the motor engages the drive gear on the axle without rubbing or slipping. You can attach the motor with hot glue because it most likely will not have to change. These cars have to take a lot of abuse so using extra hot glue and reinforcing will help them survive. The small tabs on the motor are hard for younger kids to connect to with clip leads and they tend to pull loose from the motor as excitement builds. Solder 2” red and black wires to the motor and then reinforce the contact with the wire with hot glue. Strip 1” off the free end and melt solder into this to make a make a durable place to connect the alligator clips.
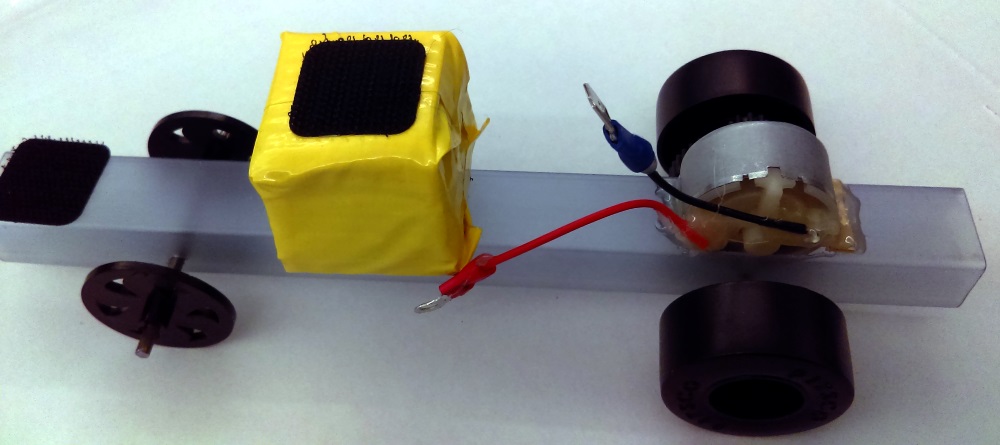
Attaching Cells.
Attach the cell (s) with Velcro or rubber band so you can try different arrangements. For the sake of consistency put the hook side on the car bodies, and the felt side on the backs of the solar cells. 2” taped wrapped Styrofoam spacer blocks wrapped with duct tape and with hook felt on one side and hooks on the other can help support cells above the wheels.

Additional Cells
The large 3 volt cell from the Raycatcher has the largest area and higher volts than the single cells. The single cells are .5 volts. If you get extra copies of single cells then kids can try combining several cells in series or parallel. You can also buy multi-volt encapsulated “battery chargers” panels which have many cells in series although that may not be obvious.
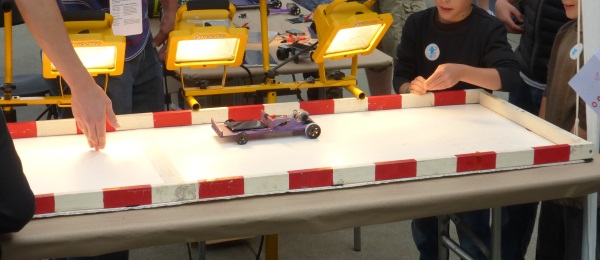
The Lights and Track
If you intend to do this activity indoors you will need big incandescent lights, room lighting is never enough. Two double 500 watt halogen work lights on stands will illuminate a 6ft track on top of table. An incandescent spot light held in a clip-on reflector base is handy so that students can test their cars before reaching the track. Silicon solar cells are able to use the infrared and visible output from incandescent bulbs.
If you are racing on a table top it is helpful to build a race track out of 1×2 pine boards assembled into a 2ft x 6ft frame with screws. This wood edge prevents the cars from shooting off the end. It’s also helpful to have a smooth race surface provided by a 2’x 6’ section of foam core that has been attached to the frame.
If you doing the activity outdoors in the sun then find a smooth section of pavement and define the race area with flags so that bystanders don’t shade the track or accidentally step on the cars.
Running the Race
At a busy STEM fair it can take 3 people to man a booth: 1-2 to work with kids and one person to separate panels from cars and keep the construction area organized and to answer questions from adults.
Some cautions:
- The halogen bulbs are very hot and it’s better to keep kids from reaching in from the light side of the tracked.
- Do not place the bulbs too close to the table or leave cars under the lights too long. The plastic housing of the smaller encapsulated cells may melt with the heat of the light.
- These bulbs are not meant for rough use. Be careful when moving the holder or setting the holder down, especially if the bulb is turned on, or else you can jar the filament and burn out the bulb.
Let the races begin…
Let the students pick a solar cell and car body and try their luck. Students learn from each other and soon figure out the polarity of the wires and the need for making a complete circuit. You may have to help younger kids figure out the alligator clip or make suggests to for supporting the cells. You can set up a side by side race or a race against a stop watch. Keeping track of times and variation in design reinforces the idea of methodical data collection in experimentation. Let the students help develop the rules for the race, and develop categories if they feel that would be fairer.
Instructional Dialogue
In modeling good scientific experimental practice and engineering design methods it’s good to start with a basic “control” version of the car just as the kit instruction describe and then try to optimize various factors. Building the car is really a reason to have a conversation about solar energy. It’s good to start with what the student already knows and then stretch the knowledge with questions or challenges. Depending on the grade level you might try some of these questions with students.
Where does the energy for a regular car come from? Where does the energy from this car come from?
What are advantages of solar energy? (it doesn’t pollute or make carbon dioxide, it doesn’t run out, its free once you buy the equipment)
What do you have to do to make a complete circuit? (electricity must flow from one lead on the solar cell to the motor, and from the motor back to the other lead on the solar panel. Make an analogy to a battery)
What do you do if your car run backwards? (reverse the wires, reverse the polarity and the motor will run the other direction)
Where do so solar panels usually go? (on the roof of buildings or in flat fields)
Are there full size solar cars you can drive? (In Australia they have a race each year with cars that are powered by solely by solar. The area of cells needed is larger than the car itself.
When does the panel capture the most energy? (When it is facing the sun/light directly)
What angle would be best for today? (If it is late in the day the panel will have to tipped up.)
What is one big problem with solar cars? (They won’t work at night or in the shade)
How could you overcome this problem? (add batteries which can charge up in the sun)
What are the differences you notice between the different cells? (size, patterns, covering, number of cells within a panel)
What are two things you can measure with a multimeter (voltage and current- you can try to explain the difference with the water in a hose analogy- voltage is the pressure, the size of the hose and amount of water flowing is the current)
What is the voltage of a single solar cell? (about .5 volts)
How can you get a higher voltage? (wire several cells together in series)
How can you get higher amperage? (have larger cells, or cell wired in parallel)
How do you measure power? (multiply the voltage by the current to get watts- the load or resistance in the circuit will change both of these. The peak power point in the combination of voltage and current which produces the highest power)
What different kinds of solar cells are available? (monocrystalline solar cells are the most efficient, followed by polycrystalline, amorphous silicon, Copper Indium Gallium selenide –CIGS, dye sensitized cells and plastic solar cells.)
Extensions
Once you have completed and raced the basic kits the students should have gained feeling for what factors might make a difference. Now it is time to design and build some variations. Rather than just turning kids loose with materials it is good to have them create a design on paper with these elements.
- Name of trial/model
- Sketch of model
- Special features
- How special features work
As a leader you can guide students through this process with a “socratic” dialogue. For example ask “What could you do to make your car go faster, and win the race?” If they suggest adding more solar cells then “How would you connect the additional solar cells?”, “How would you support them?”, and “What do you predict the result will be?
Solar Cell Angle
After you trouble-shoot the basic drive train, wheels and body assembly– the first variation that students may discover is that of angle of the panel. Students can fashion supports that turn the cell to be perpendicular to the incoming rays. Explain that the solar cells capture incoming solar energy according for an area equal to the shade. Use a loose solar cell to show how changing the angle changes the size of the shadow. Ask them to determine what angle would capture the most light. Some of the cells have a lens pattern on the cover glass which is supposed to help them work at wider range of angles. You can make angle more important by arranging a race direction that is not advantageous for the current sun or light angle.
Solar Cell area
Adding more, bigger or better solar cells is the sure-fire method to improve power. Have students predict the winner for variations such as adding 2 or three additional cells, changing to a larger panel, adding reflectors to capture more light. Use an electric meter to measure the current and voltage that the proposed cells can produce in the given light. Compare this to the output from a single cell. They could also connect their cells to a motor and compare the speed rotation. Consider also the effect of wiring pattern. See wiring below.
Once they have selected the cells to use they have to figure way to attach and support them on the basic chassis. This may involve adding an additional support panel made from foam core or balsa.
2Two cells added to sunzoom
Wiring
Two or more solar cells can be added with parallel or series wiring. In series the voltage of each cell is added and current is the same as any single cell. In parallel the current of each cell is added and the voltage is the same as an individual cell. Power is voltage x current. So for considering two cells.
.48V x 86 ma (parallel) = 41 mW = .96V x 43 ma (series)
Thus different wiring should not influence the total power delivered.
However motors are rated for a certain voltage range such as 1.5-6 volts. Each motor has its own characteristic performance issues such as needing a higher amperage to get started and then requiring more voltage to turn faster. One characteristic is needed to get rolling but another to win the speed race. A series circuit is sensitive to internal resistance of the cells. Furthermore, the maximum power output from a solar cell occurs at a certain combination of voltage and current. It is possible to force a cell to output at a combination of volts and amps that is not optimized for that cell.
The easiest way to answer the question of series and parallel wiring for multiple cells is to do the experiment!
Other factors
A solar car made at the National Science and Engineering Festival DC, 2010
Students always want to streamline their models so they look cool and hope they will go faster. Wind resistance increases with the square of the speed. For this size model and at these low speeds wind resistance is a negligible factor.
Other factors that do make a difference is resistance against the axles, poor alignment of the drive gears, rubbing wires or rubbing wheels and chassis, and variability of each solar cell outputs.
Students can explore using some of the other gears in the kit. A smaller gear on the motor and bigger gear on the wheel will make it easier to get started if for example light conditions are low, but limit the speed once rolling. Increasing the gear on motor increases the relative speed of the wheels.
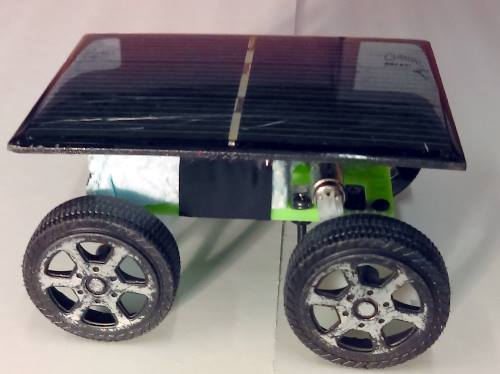
Mini Solar Cars
Pre-built mini cars are fun but still need full sun. The assembly kits are may be challenging for younger students but they provide all the parts to car for under $5. You can cut off the solar cell and attach durable wires to the motor to make an experimental chassis.

Resources
Where to get your materials
Cars
Pitsco Sunzoon Lite Car
Pitsco SunZoon Car
Raycatcher Car (big panel)
Mini Solar Car Assembly Kits
Geared Solar Car Assembly Kits
Solar Mini Car (pre-built)
Solar Cells
Electronics Goldmine Solar Cells
Pitsco Mini Solar Panels with Leads
Allpower Solar Panel (needs wires attached)
.65 W 1.4V Solar Panel with Wires