

Created by Nathan Wilson for the University of Washington Clean Energy Institute
Overview:
The goal of this activity is to allow students to apply their knowledge of Ohm’s law to a more intuitive and visual system: water flowing through tubes. The total time for this activity is around 30 minutes. Students are assumed to be familiar Ohm’s law (V/R=I) where V is volts, R is resistance, and I is current, as well as the formula for calculating the resistance of a resistor (R=ρl/A). where p is resistivity in ohms/meter, l is length, A is area of the conductor.
Essential Question:
How can we model the behavior of electricity in a wire with water and a hose?
Background:
The water/hose analogy for electricity is useful for explaining voltage, current, and power. In general terms, charge is water, voltage is the pressure of water, current is the flow of the water. Power is the total amount of water flowing in given time. You can have a small pipe with high pressure, or a large pipe with low pressure each passing the same amount of water. Increasing the height of the water reservoir increases the potential energy of the water (voltage). Resistance can be explained as the roughness of the width of the pipe.
- In the first part of the lab, students will learn that the flow rate of a liquid through a tube, given a steady source, decreases when you make the diameter of the pipe smaller. This is analogous to the behavior of a resistor: when you decrease the cross-sectional area of a resistor (A), the resistance increases, so by Ohm’s law, for a constant voltage, the current must drop.
- In the second part of the lab, students will learn that the flow rate of a liquid through a tube will similarly decrease when you increase the length of the pipe.
- In the final part of the lab, students will learn that the flow rate of a liquid through a tube decreases when you lower the water pressure by moving the water source to a lower elevation. In this analogy, pressure plays the role of voltage. For a fixed resistance, a decrease in voltage leads to a decrease in current.
Research Connection:
Researchers are developing materials with low resistance for energy efficient electronics. The flow of electrons in a solar cell can be optimized by using a grid of highly conductive metal as a collector. The exact design of this grid depends on an understanding of sheet resistance.
NGSS Standards:
| Standard Number | Standard text |
| HS-PS3-3. | Design, build, and refine a device that works within given constraints to convert one form of energy into another form of energy.* |
| Developing and Using Models | A practice of both science and engineering is to use and construct models as helpful tools for representing ideas and explanations. These tools include diagrams, drawings, physical replicas, mathematical representations, analogies, and computer simulations. |
Materials:
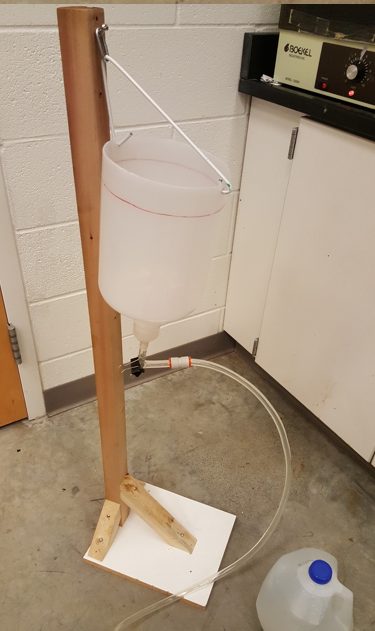
- Water tank with quick-connector tube
- Tubing clamp
- 5 foot long large diameter tube (3/8” hole)
- 5 foot long medium diameter tube (1/4” hole)
- 5 foot long small diameter tube (1/8” hole)
- 20 foot long small diameter tube (1/8” hole)
- 5 liter beaker
- Large basin
- Lab stand
- Stop watch
- This brings the price for 10 experiments to $398.19. The tubing is likely cheaper from another supplier, and other types of tubing can be used. The tube should be flexible and supple, but not squishy like latex tubing (the push-to-connect tube won’t work with squishy tubing).
- Additionally, you will need a lab stand, a tub for catching any spilled water, a 0.5L beaker, a timer, a binder clip, and a gallon milk jug. Cut a large hole in the bottom of the milk jug, large enough to easily pour water through. Punch small holes on either side of the milk jug, near the bottom. You will use these for hanging the milk jug from the lab stand, which can be done by bending a wire hanger into a triangle shape through the holes. Drill a hole in the milk jug cap that is very close in size to the narrowest point on the NPT threaded side of the barbed tube fitting, and screw it in tightly.
Model Construction
- Cut a short length, around 4” of the 3/8” ID tube, and push it over the threaded barbed adapter. For the push-to-connect adapter, push it over the other end of the 3/8” ID tube as deep as it will go. Give it a gentle tug to make sure it’s secure. To disconnect, pull the tube gently away from the connector while pushing inwards on the orange disk.
- Cut two short lengths, around 2”, of the ¼” ID tube, and push over two of the double barbed adapter. Cut 5 feet off the 1/8” tube. Attach both the 5ft length and the 20ft length to the other ends of the double barbed adapters. Keep the 20ft long tube coiled up and secured with a twisty tie so that it doesn’t end up knotted up.
Procedure:
- Hang the water tank near the middle of the lab stand and clamp down on the quick-connector tube using the tubing clamp. This will be used as a valve throughout the experiment.
- Fill the water tank with a couple inches of water and make sure it’s not leaking. Once you’re sure, fill it up with water to the line on the outside of the tank.
- Plug the 5 foot long “large” tube into the quick connector. Make sure it goes all the way in. Double check by gently pulling on it to make sure it doesn’t come out.
- Place the 0.5L beaker in the basin and have one lab partner hold the tube so that it’s pointing into the beaker.
- The other lab partner should get the timer ready, and open the valve. The timer should be started only once water starts to come out of the tube, not when the valve is opened. Once the beaker is completely full and just barely begins to spill, stop the timer, stop the flow, and record your time here: ____________
- Slowly disconnect the quick-connector by pushing in on the colored ring and slowly sliding the 5 foot long tube out. Allow the tube to drain into the basin.
- Refill the tank to the line on the side.
- Repeat steps 3-7 with the 5 foot long “medium” tube. Record the time it took to fill the beaker here: ____________
Now make a prediction. If you use the 5 foot long small tube, will it take a longer or shorter time to fill the beaker than the last tube? In your own words, explain why you made that prediction.
- Repeat steps 3-5 with the 5 foot long “small” tube. Leave the tube attached when you’re done, and refill the tank Record the time it took to fill the beaker here: ____________
Was your prediction about the small tube correct? Why do you think you got this result?
- Now move the water tank to near the top of the lab stand and refill it.
- Repeat steps 3-7 and record the time it took to fill the beaker here: ____________
Did the beaker fill faster or slower when you lifted the tank to a higher position? Why?
- Plug the 20 foot long “small” tube into the quick connector.
Do you think it will take a longer or shorter time to fill the beaker using the 20 foot small tube than it took with the 5 foot small tube (step 11)? In your own words, explain why you made that prediction.
- Repeat steps 3-7 with the 20 foot long “small” tube. Record the time it took to fill the beaker here: ____________
Was your prediction about the long tube correct? Why do you think you got this result?
Extensions:
Build model water turbine that can be used to test the effect of head on the power of your water model.
Resources:
- Water Model for Electricity lesson
- A good explanation of ohms law can be found at:
- https://learn.sparkfun.com/tutorials/voltage-current-resistance-and-ohms-law
Sources:
- https://www.thingiverse.com/thing:3170748 water turbine plans