

Electrochemical Chameleon
By Katie Corp- Schlencker Research Group
Students experiment with acidity of solutions and then use electricity to split water into hydrogen and oxygen and observe changes in the solution.
QUESTION
How can water be split into its simple elements?
Background
Normal tap water (H2O) is electrolyzed using a common 9-volt battery Epsom salt. The H2 and O2 gases that are produced are isolated and collected safety in separate containers. A natural anthocyanin pH indicator extracted from red cabbage is used to show vividly color changes at the positive and negative terminals of the battery during the water splitting process. The positive terminal becomes acidic and the terminals are often incorrectly labeled since hydrogen is thought to be acidic. The products of water splitting is hydrogen gas (H2) and oxygen gas (O2), which are both neutral species. Hydrogen ions (H+), which are acidic, are a byproduct produced in the oxidation process.
Hydrogen can be used for energy storage when it is recombined with atmospheric oxygen in fuel cell. Most hydrogen today is actually produced by reforming hydrogen rich natural gas.
Research Connection
Researchers are developing new catalysts for water splitting. Some can split water directly when exposed to sunlight– photocatalysis.
NGSS Standards
| Standard Number | Standard text |
| 4-PS3-4 | Apply scientific ideas to design, test, and refine a device that converts energy from one form to another.* |
| MS-PS1-2 | Analyze and interpret data on the properties of substances before and after the substances interact to determine if a chemical reaction has occurred. |
| MS-PS1-5 | Develop and use a model to describe how the total number of atoms does not change in a chemical reaction and thus mass is conserved. |
| HS-PS3-3. | Design, build, and refine a device that works within given constraints to convert one form of energy into another form of energy.* |
Materials
- Vinegar
- 9V battery
- Thumbtack
- Soft Plastic Cup like Tupperware
- Plastic Test Tubes
- Red Cabbage Indicator – add 4-5 scoops of the powdered cabbage juice each liter of water used (for a classroom with 12 pairs, 2-3 liters should suffice)
Procedure
Hazards:
Vinegar (an acid) and ammonia (a base) can irritate the skin and eyes. Avoid direct contact with skin and eyes. In the event of direct contact flush with water for 15 minutes. Natural anthocyanin dyes can stain clothing and skin. Avoid spilling anthocyanin dyes on clothing and skin. H2 and O2 gases are flammable, avoid being in close proximity to sparks and fire.
Protocol for Acid Bath pH indicator lab:
- Pair up with a partner and obtain eight vials from the stock station for your group
- Number your vials 1 – 8 with a permanent marker
- Halfway fill each of your vials with the stock pH indicator solution
- To vial 1 add a few drops of vinegar (an acid) and record your observations
- To vial 2 add a few drops of lemon juice and record your observations
- To vial 3 add a few drops of Sprite and record your observations
- To vial 4 add a few drops of tap water and record your observations
- To vial 5 add a few granules of antacid and record your observations
- To vial 6 add a few granules of baking soda and record your observations
- To vial 7 add a few granules of baking powder and record your observations
- To vial 8 add a few drops of Ammonia (a base) and record your observations
Protocol for Electrolysis Lab:
- Make two marks on the bottom of your plastic storage that are the same distance apart as the terminals of your 9-volt battery
- Insert one thumbtack into the bottom of the container at each of the marks that you have made as shown in Fig. 1 to form an electrolysis cell
- Pour purple pH indicator solution into your new electrolysis cell until the container is 3/4 of the way full
- Return to your work station and insert two plastic pipettes into the purple pH indicator solution
- Squeeze the bulb of each pipette one time and release it to fill each pipette with the same amount of solution
- Without removing the tips of the pipettes from the solution, place each pipette tip over one of the electrodes in your electrolysis cell
- With the help of your partner to stabilize the pipettes so that they don’t disconnect from the electrodes, place your electrolysis cell on top of your 9-volt battery so that each battery terminal is connected to only one of the thumbtacks that is inserted into the bottom of your cell .
- Record your observations here
- Remove the pipettes from the cell terminals and dispense their contents back into the electrolysis cell
- Add one teaspoon of Epsom Salt (magnesium sulfate, MgSO4) to your electrolysis cell and stir the resulting solution until it is almost entirely dissolved
- Insert the two plastic pipettes into the purple pH indicator solution again
- Squeeze the bulb of each pipette one time and release it to fill each pipette with the same amount of solution
- Without removing the tips of the pipettes from the solution, place each pipette tip back over one of the electrodes in your electrolysis cell again
- This time switch roles with your partner to stabilize the pipettes so that they don’t disconnect from the electrodes while your partner places the electrolysis cell on top of your 9-volt battery so that each battery terminal is connected to only one of the thumbtacks that is inserted into the bottom of your cell
- Record your observations
- Dispose of your solutions down the drain.
- Rinse out and return your glassware
Questions
- What happened at the positive battery terminal? (The solution turned red and gas evolved.)
- What happened at the negative battery terminal?( The solution turned green and gas (more) evolved.)
- How much solution was left in each of your pipettes when your experiment was finished? What does this mean about the volume of gas that was produced at each terminal? (Twice as much gas evolved on the negative terminal of the battery compared to the positive terminal.)
- From Question #3, explain how we know that water has the molecular formula H2O?( Twice as much hydrogen is available compared to oxygen in the formula for water (H2O), so more hydrogen gas is evolved in the water splitting process. )
- Do you think that the solution at the positive terminal was acidic, basic, or neutral? (The positive terminal of the battery will undergo oxidation, which means oxygen gas is formed which has a byproduct of hydrogen ions, lowering the pH so the solution turns red (see redox reaction below)
- Do you think that the solution at the negative terminal was acidic, basic, or neutral? (The negative terminal of the battery will undergo reduction, which means hydrogen gas is formed which has a byproduct of hydroxide ions, increasing the pH so the solution turns green (see redox reaction below)
Bonus
Bonus: Write the half reactions occurring at the electrodes (one at each electrode)
2?2?→2?2+?2 (full reaction)
2?2?+2?−→?2+2??− (reduction)
2?2?−4?−→?2+4?+ (oxidation)
To get full reaction from the half reactions, the electrons must cancel. Thus, multiple the reduction half reaction by two and add the resulting equation to the oxidation half reaction.
Note that ??−+?+=?2?.
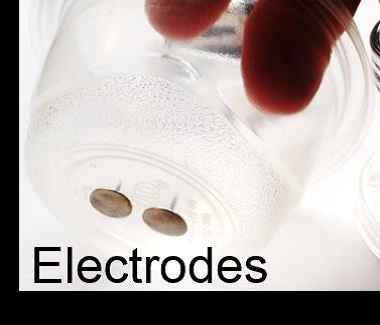
 and 1 part O2 (smaller volume) using a common 9-volt battery and two thumbtacks also generates acid (red) at the anode and base (green) at the cathode.")
Fig. 1. We have extracted a natural anthocyanin dye from red cabbage. We use this dye as a universal pH indicator. The color change from purple to green or red allows us to show that splitting water into 2 parts H2 (larger volume of gas) and 1 part O2 (smaller volume) using a common 9-volt battery and two thumbtacks also generates acid (red) at the anode and base (green) at the cathode.
Extensions
- Try burning the hydrogen by bringing a match to the hydrogen tube. Blow out the match and while its still glowing place it in the oxygen filled tube.
- Demonstrate electrolysis / fuel cell with the fuel cell car listed below.
Resources
Where to get your materials
Electrochemical Chameleon Student Handout
(Printable version included on the lesson plan above)
Normal tap water (H2O) is electrolyzed using a common 9-volt battery and Epsom salt. The H2 and O2 gases that are produced are isolated and collected in separate containers. Anthocyanin dye used as a pH indicator was extracted from red cabbage is used to show vivid color changes at the positive and negative terminals of the battery during the water splitting process. This activity can also be done with a solar panel instead of a battery!
Hazards
Vinegar (an acid) and ammonia (a base) can irritate the skin and eyes. Avoid direct contact with skin and eyes. In the event of direct contact flush with water for 15 minutes. Natural anthocyanin dyes can stain clothing and skin. Avoid spilling anthocyanin dyes on clothing and skin. H2 and O2 gases are flammable, avoid being in close proximity to sparks and fire.
Protocol for Acid Bath pH indicator lab:
- Pair up with a partner and obtain eight vials from the stock station for your group
- Number your vials 1 – 8 with a permanent marker
- Halfway fill each of your vials with the stock pH indicator solution
- To vial 1 add a few drops of vinegar (an acid) and record your observations
- To vial 2 add a few drops of lemon juice and record your observations
- To vial 3 add a few drops of Sprite and record your observations
- To vial 4 add a few drops of tap water and record your observations
- To vial 5 add a few granules of antacid and record your observations
- To vial 6 add a few granules of baking soda and record your observations
- To vial 7 add a few granules of baking powder and record your observations
- To vial 8 add a few drops of Ammonia (a base) and record your observations
Protocol for Electrolysis Lab:
- Make two marks on the bottom of your plastic storage that are the same distance apart as the terminals of your 9-volt battery
- Insert one thumbtack into the bottom of the container at each of the marks that you have made as shown in Fig. 1 to form an electrolysis cell
- Pour purple pH indicator solution into your new electrolysis cell until the container is 3/4 of the way full
- Return to your work station and insert two plastic pipettes into the purple pH indicator solution
- Squeeze the bulb of each pipette one time and release it to fill each pipette with the same amount of solution
- Without removing the tips of the pipettes from the solution, place each pipette tip over one of the electrodes in your electrolysis cell
- With the help of your partner to stabilize the pipettes so that they don’t disconnect from the electrodes, place your electrolysis cell on top of your 9-volt battery so that each battery terminal is connected to only one of the thumbtacks that is inserted into the bottom of your cell
- Do you observe any bubbles or color changes?
- Remove the pipettes from the cell terminals and dispense their contents back into the electrolysis cell
- Add one teaspoon of Epsom Salt (magnesium sulfate, MgSO4) to your electrolysis cell and stir the resulting solution until it is almost entirely dissolved
- Insert the two plastic pipettes into the purple pH indicator solution again
- Squeeze the bulb of each pipette one time and release it to fill each pipette with the same amount of solution
- Without removing the tips of the pipettes from the solution, place each pipette tip back over one of the electrodes in your electrolysis cell again.
- Switch roles with your partner to stabilize the pipettes so that they don’t disconnect from the electrodes while your partner places the electrolysis cell on top of your 9-volt battery so that each battery terminal is connected to only one of the thumbtacks that is inserted into the bottom of your cell
- Record your observations here
- Dispose of your solutions down the drain.
- Rinse out and return your glassware
Questions
- What happened at the positive battery terminal?
- What happened at the negative battery terminal?
- How much solution was left in each of your pipettes when your experiment was finished? What does this mean about the volume of gas that was produced at each terminal?
- From Question #3, explain how we know that water has the molecular formula H2O?
- Do you think that the solution at the positive terminal was acidic, basic, or neutral?
- Do you think that the solution at the negative terminal was acidic, basic, or neutral?
Bonus: Write the half reactions occurring at the electrodes (one at each electrode)